
Introduction to Nessus
In today’s digital environment, organisations rely heavily on servers, applications, cloud platforms, and network devices. While these technologies improve productivity, they also introduce security risks. Vulnerabilities such as outdated software, weak configurations, missing patches, and exposed services can become entry points for cyberattacks.
Nessus is one of the most widely used vulnerability assessment tools in the cybersecurity industry. Developed by Tenable, Nessus helps security professionals identify vulnerabilities before attackers can exploit them.
It is commonly used by:
- Security Analysts
- Penetration Testers
- System Administrators
- Network Engineers
- Compliance Auditors
- SOC Teams
Nessus performs automated vulnerability scanning and provides detailed reports that help organisations improve their security posture.
History of Nessus
Tenable released Nessus in 1998 as an open-source vulnerability scanner created by Renaud Deraison.
Evolution Timeline
| Year | Milestone |
| 1998 | First release of Nessus as an open-source scanner |
| 2002 | Became one of the most popular vulnerability scanners |
| 2005 | Development shifted toward a commercial model |
| 2008 | Nessus 4 introduced improved scanning capabilities |
| 2013 | Advanced compliance and reporting features added |
| 2020+ | Cloud integrations, container scanning, and modern vulnerability intelligence |
Today, Nessus is considered an industry-standard vulnerability assessment solution used worldwide.
What is Nessus?
Nessus is a vulnerability scanner that identifies security weaknesses in:
- Servers
- Workstations
- Routers
- Switches
- Firewalls
- Databases
- Web Applications
- Virtual Machines
- Cloud Infrastructure
It compares discovered services and software against a constantly updated vulnerability database and generates a detailed assessment report.
Purpose of Nessus
The primary objective of Nessus is to identify security weaknesses before attackers find them.
Key Purposes
1. Vulnerability Detection
Detects known vulnerabilities such as:
- CVEs
- Missing patches
- Outdated software
- Misconfigurations
2. Compliance Auditing
Checks compliance with:
- ISO 27001
- PCI-DSS
- HIPAA
- NIST
- CIS Benchmarks
3. Patch Management Support
Helps administrators identify systems requiring updates.
4. Risk Assessment
Provides vulnerability severity ratings:
- Critical
- High
- Medium
- Low
- Informational
5. Security Monitoring
Regular scans help maintain ongoing security visibility.
Nessus Architecture
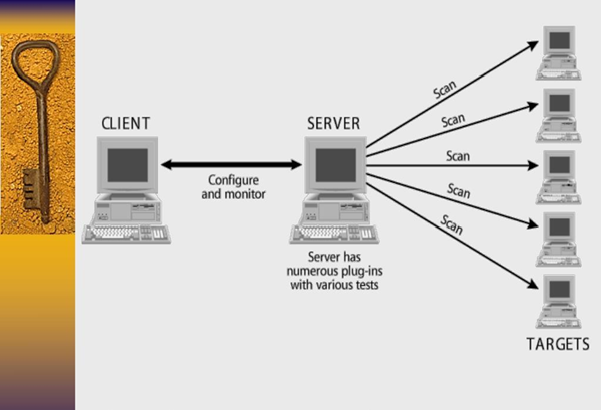
The Nessus architecture consists of multiple components working together.
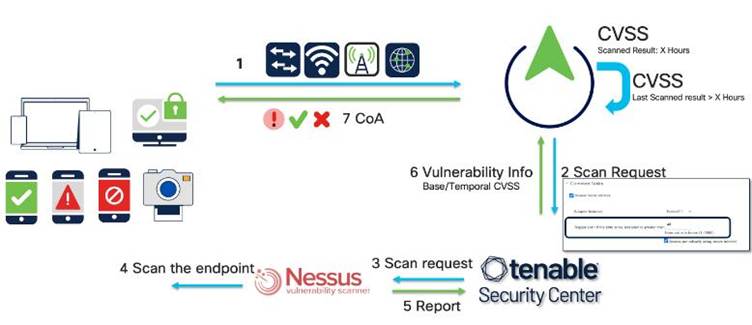
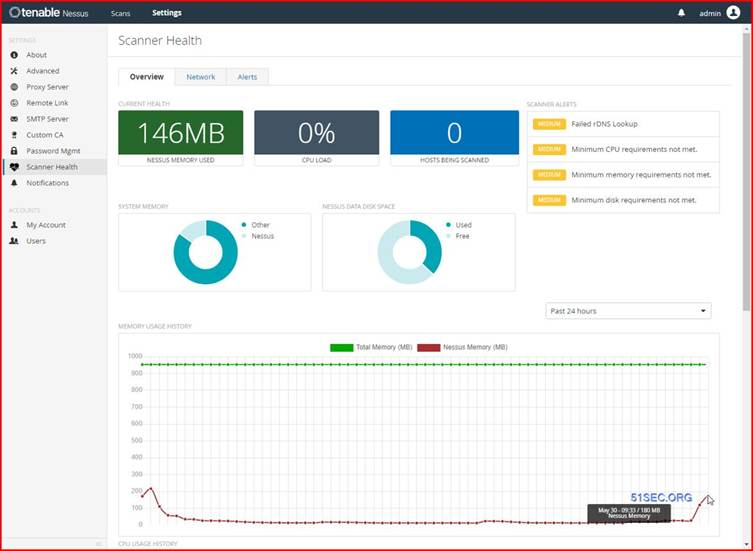
4
Components
1. User Interface
Web-based management console used to:
- Configure scans
- Schedule scans
- Review vulnerabilities
- Generate reports
2. Nessus Scanner Engine
Core scanning component that:
- Performs host discovery
- Detects services
- Executes vulnerability checks
3. Plugin Database
Contains thousands of vulnerability checks.
Plugins are regularly updated by Tenable.
4. Target Systems
Includes:
- Servers
- Endpoints
- Applications
- Network Devices
5. Reporting Engine
Generates reports in various formats:
- HTML
- CSV
- Nessus XML
How Nessus Works
The scanning process follows several stages.
Step 1: Host Discovery
Nessus identifies live hosts using:
- ICMP
- ARP
- TCP Ping
- UDP Ping
Step 2: Port Scanning
Determines open ports such as:
| Port | Service |
| 22 | SSH |
| 80 | HTTP |
| 443 | HTTPS |
| 3389 | RDP |
| 3306 | MySQL |
Step 3: Service Enumeration
Detects:
- Operating System
- Software Versions
- Running Services
Step 4: Vulnerability Checks
The plugin engine compares results against known vulnerabilities.
Examples:
- CVE-2025-XXXX
- Missing Windows Updates
- Weak SSL/TLS Configurations
- Unsupported Operating Systems
Step 5: Risk Scoring
Uses CVSS scores:
| Severity | CVSS |
| Critical | 9.0–10 |
| High | 7.0–8.9 |
| Medium | 4.0–6.9 |
| Low | 0.1–3.9 |
Step 6: Report Generation
Produces actionable remediation recommendations.
Installing Nessus on Windows
Step 1: Download Nessus
Visit:
Download:
- Windows x64 Installer
Step 2: Install
Run:
Nessus-x.x.x-x64.msi
Follow the installation wizard.
Step 3: Start Service
Open Services:
services.msc
Verify:
Tenable Nessus
is running.
Step 4: Access Web Console
Open:
Step 5: Activate
Choose:
- Nessus Essentials (Free)
- Nessus Professional
Enter activation code.
Installing Nessus on Ubuntu Linux
Download Package
wget https://www.tenable.com/downloads/api/v1/public/pages/nessus/downloads/latest/download?i_agree_to_tenable_license_agreement=true -O nessus.deb
Install Package
sudo dpkg -i nessus.deb
If dependencies occur:
sudo apt –fix-broken install
Start Service
sudo systemctl start nessusd
Enable at boot:
sudo systemctl enable nessusd
Check status:
sudo systemctl status nessusd
Access Interface
Installing Nessus on RHEL / Rocky Linux / CentOS
Download RPM package.
Install:
sudo rpm -ivh Nessus-x.x.x.rpm
Start service:
sudo systemctl start nessusd
Enable service:
sudo systemctl enable nessusd
Verify:
sudo systemctl status nessusd
Access:
Installing Nessus on macOS
Download:
- macOS Installer (.dmg)
Mount package:
open Nessus.dmg
Install:
sudo installer -pkg Nessus.pkg -target /
Start service:
sudo launchctl load /Library/LaunchDaemons/com.tenablesecurity.nessusd.plist
Open browser:
Complete activation.
Creating Your First Scan
After login:
New Scan
Select:
New Scan
Choose:
Basic Network Scan
Configure Scan
Enter:
Name: Internal Network Scan
Targets:
192.168.1.0/24
Save
Click:
Save
Launch
Click:
Launch
Nessus begins scanning.
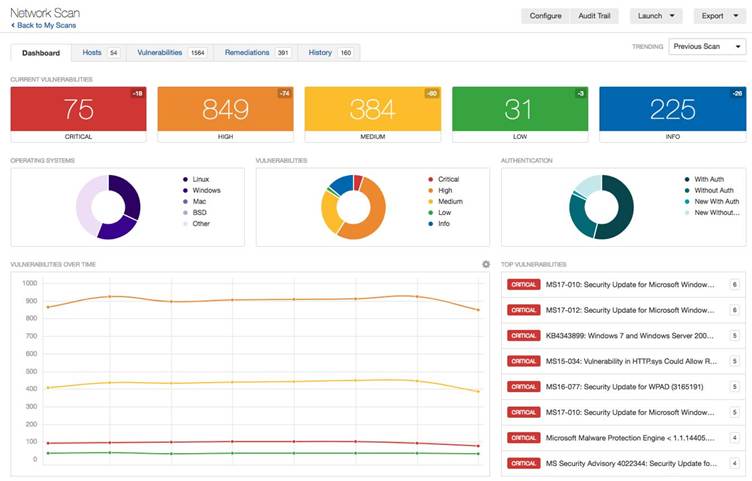
Understanding Scan Results
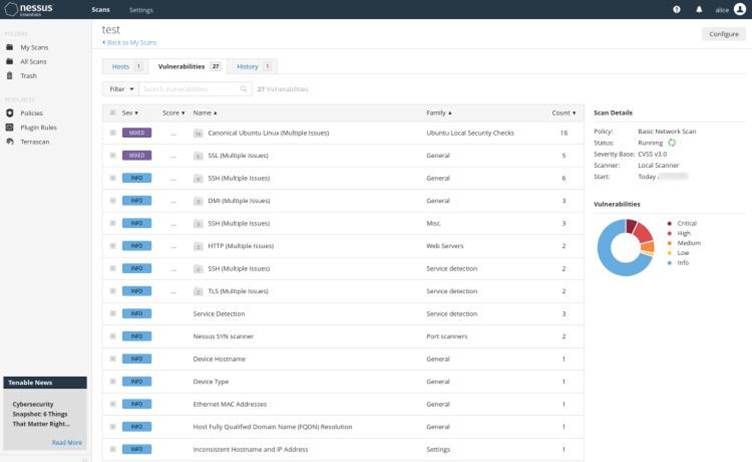
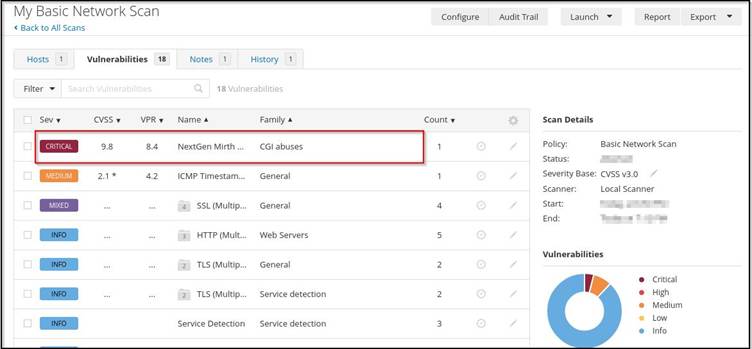
5
Results are grouped by severity.
Example:
| Severity | Count |
| Critical | 5 |
| High | 12 |
| Medium | 28 |
| Low | 40 |
Each finding includes:
- Vulnerability Description
- CVE Reference
- CVSS Score
- Affected Host
- Remediation Steps
Generating Reports in Nessus
Step 1
Open completed scan.
Step 2
Select:
Export
Step 3
Choose format:
- HTML
- CSV
- Nessus XML
Step 4
Generate report.
The report typically contains:
Executive Summary
Overall risk overview.
Vulnerability Summary
Critical and high-risk findings.
Technical Details
- CVE IDs
- Plugin IDs
- Evidence
- Impact
Remediation Recommendations
Patch and configuration guidance.
Common Nessus Scan Types
| Scan Type | Purpose |
| Basic Network Scan | Network assessment |
| Host Discovery | Live host identification |
| Advanced Scan | Custom scanning |
| Web Application Tests | Website assessment |
| Credentialed Scan | Deep vulnerability analysis |
| Malware Scan | Malware detection |
| Compliance Scan | Regulatory compliance |
Best Practices for Using Nessus
Keep Plugins Updated
Always update vulnerability feeds before scanning.
Use Credentialed Scans
Provides deeper visibility than non-credentialed scans.
Scan Regularly
Recommended:
- Weekly internal scans
- Monthly external scans
Prioritize Critical Findings
Remediate:
- Critical
- High
- Medium
- Low
Verify Vulnerabilities
Validate critical findings manually before remediation.
Advantages of Nessus
✅ Easy to deploy
✅ Large vulnerability database
✅ Accurate reporting
✅ Compliance auditing
✅ Credentialed scanning
✅ Web-based management
✅ Regular plugin updates
Limitations of Nessus
❌ Commercial licensing for advanced features
❌ Can generate false positives
❌ Resource-intensive during large scans
❌ Not a replacement for manual penetration testing
Conclusion
Nessus remains one of the most trusted vulnerability assessment platforms available today. Whether you are a security analyst, penetration tester, system administrator, or compliance auditor, Nessus provides an efficient way to identify security weaknesses, prioritize risks, and improve overall cybersecurity posture.
By combining automated vulnerability detection, compliance auditing, credentialed assessments, and detailed reporting, Nessus helps organizations proactively defend against cyber threats and maintain a secure IT environment.