
1.Introduction to OpenVAS (Greenbone)
In today’s digital environment, organizations operate complex IT infrastructures consisting of servers, workstations, network devices, web applications, databases, cloud platforms and other connected systems. Every component can contain security weaknesses that attackers may exploit.
Identifying these weaknesses before they are exploited is an essential part of cybersecurity management. This is where OpenVAS (Open Vulnerability Assessment Scanner) becomes useful.
OpenVAS is an open-source vulnerability scanning engine that forms part of the broader Greenbone Vulnerability Management (GVM) solution, now commonly presented as Greenbone Community Edition.
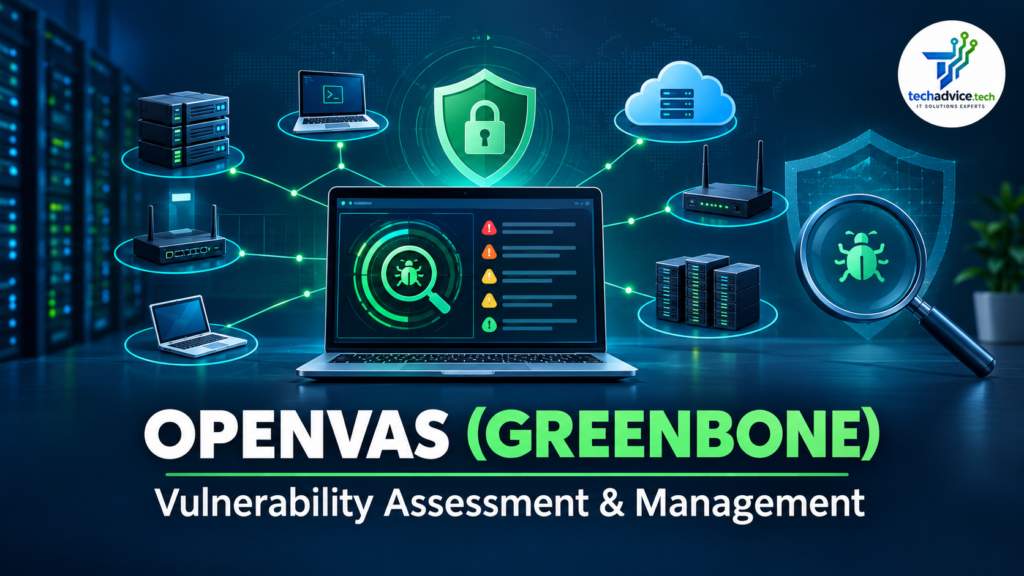
It helps security professionals identify vulnerabilities, misconfigurations, outdated software, exposed services and other security weaknesses across IT infrastructure.
The scanner uses regularly updated Vulnerability Tests (VTs) to examine target systems and identify known security issues.
Unlike a simple port scanner, OpenVAS performs vulnerability-oriented checks and provides information about the identified findings, their severity and possible remediation.
In simple terms: OpenVAS helps an organization understand what security weaknesses exist in its IT infrastructure and which issues should be addressed first.
2. History and Evolution of OpenVAS
The development of OpenVAS is closely connected with the history of the Nessus vulnerability scanner.
Important milestones
| Year | Development |
| 2005 | Nessus moved away from its open-source licensing model towards a proprietary business model. |
| 2006 | OpenVAS emerged as one of the open-source forks created in response. |
| 2008 | Greenbone was founded in Germany to support and develop OpenVAS. |
| 2009 | Greenbone began expanding the scanner into a complete vulnerability management solution, including a web interface and management service. |
| 2010 | Greenbone Security Manager appliance products entered the market. |
| 2017 | OpenVAS 9 was released, followed by the Greenbone Vulnerability Management (GVM) naming for subsequent framework releases. |
| 2022 | Greenbone Community Edition became the umbrella name for Greenbone’s open-source software efforts. |
The project gradually evolved from a vulnerability scanning engine into a comprehensive vulnerability management platform.
Today, OpenVAS is an important component of the Greenbone Community Edition and is used by security professionals, system administrators, penetration testers and security assessment teams.
Historical information:
Greenbone Community Documentation+1
Suggested supporting image: Greenbone vulnerability management architecture.
3. What is the difference between OpenVAS, GVM and Greenbone?
These terms are often used interchangeably, but they have different meanings.
| Term | Description |
| OpenVAS | The vulnerability scanning engine that performs security tests. |
| GVM | Greenbone Vulnerability Management, the broader management framework. |
| GVMD | Greenbone Vulnerability Management Daemon; manages scans, users, targets and results. |
| GSA | Greenbone Security Assistant, the web-based user interface. |
| GSAD | The service providing the web interface and API communication. |
| Greenbone Community Edition | The open-source vulnerability management solution incorporating these components. |
The important point is that installing only the OpenVAS scanner does not necessarily provide the complete vulnerability management environment. For most users, installing Greenbone Community Edition is the better approach.
Greenbone Community Documentation+1
4. Architecture of OpenVAS (Greenbone)
Greenbone follows a modular architecture in which different services work together to identify, manage and report vulnerabilities.
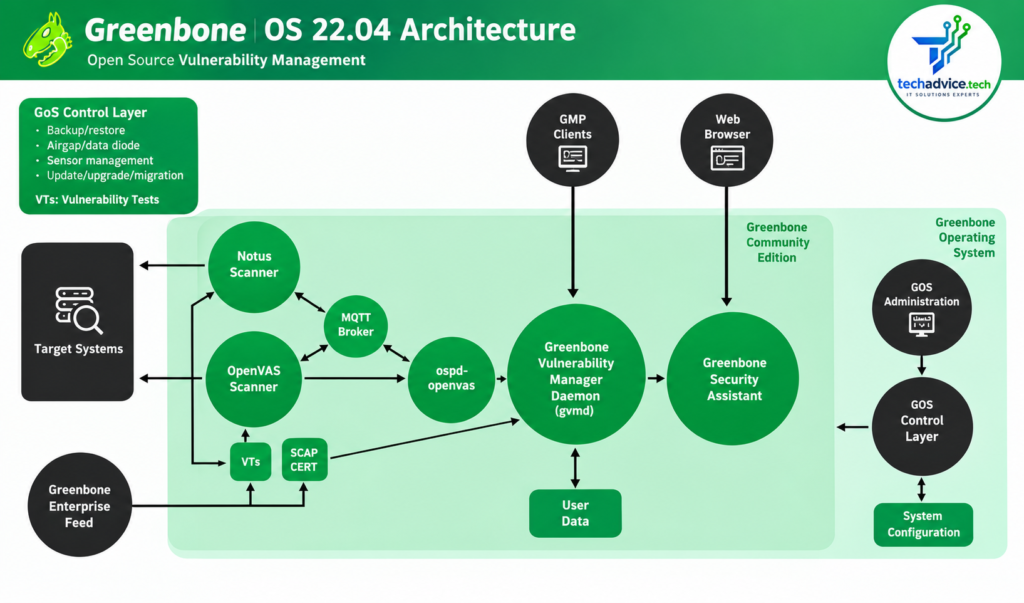
Major architectural components
1. OpenVAS Scanner
The scanner is responsible for executing Vulnerability Tests against target systems. It identifies known vulnerabilities, exposed services, software weaknesses and security misconfigurations.
2. Greenbone Vulnerability Management Daemon (GVMD)
GVMD acts as the central management service. It manages:
- Scan configurations
- Target systems
- Scan schedules
- User accounts and permissions
- Vulnerability assessment results
- Reports and task management
3. Greenbone Security Assistant (GSA)
GSA is the web-based graphical interface through which administrators interact with Greenbone. Users can configure targets, create scanning tasks, monitor progress and download reports.
4. Greenbone Security Assistant Daemon (GSAD)
GSAD provides communication between the web interface and the management service.
5. PostgreSQL Database
PostgreSQL stores management information, scan results, configuration data and other relevant records.
6. Redis
Redis supports scanner operations and data handling.
7. Vulnerability Test Feeds
Greenbone provides vulnerability test data and related security information. The Community Feed supplies the vulnerability tests and other data required for scanning.
How the components work together
The overall workflow is:
Security Administrator
Creates scan targets and tasks
GSA / GSAD
Web interface and API communication
GVMD
Manages and coordinates scanning tasks
OpenVAS Scanner
Executes vulnerability tests against targets
Target Infrastructure
Servers, desktops, network devices and applications
Results and Reports
Severity, CVEs, evidence and remediation recommendations
5. Major use cases of OpenVAS
OpenVAS can be used in different security assessment activities.
5.1 Network vulnerability assessment
Organizations can scan their internal and external network assets to identify:
- Open ports and unnecessary services
- Outdated operating systems
- Vulnerable network services
- Weak service configurations
- Known security vulnerabilities
5.2 Server security assessment
System administrators can use OpenVAS to assess Linux and Windows servers for outdated packages, vulnerable services, missing security updates and other weaknesses.
5.3 Vulnerability assessment before penetration testing
OpenVAS can help security teams identify known weaknesses before conducting a detailed penetration test. It can also help prioritize areas that require manual verification.
5.4 Compliance and security auditing
Vulnerability scanning can support security assessment activities associated with:
- ISO/IEC 27001:2022
- Internal IT security audits
- Vulnerability management policies
- Risk assessment processes
- Security hardening reviews
However, a vulnerability scan alone does not establish compliance with ISO 27001 or any other certification standard.
5.5 Continuous vulnerability monitoring
Organizations can schedule periodic scans and compare findings to identify newly discovered vulnerabilities and verify whether previously identified issues have been resolved.
5.6 Cloud infrastructure assessment
Security teams can assess authorized cloud-hosted virtual machines and network-accessible services, subject to cloud provider policies and network access restrictions.
6. System requirements before installation
Greenbone’s container documentation specifies the following baseline requirements:
| Component | Minimum | Recommended |
| CPU | 2 cores | 4 cores |
| RAM | 4 GB | 8 GB |
| Storage | 20 GB | 60 GB |
| Network | Internet connectivity | Stable broadband |
For larger networks and multiple simultaneous scans, additional CPU, RAM and storage may be required.
Greenbone Community Documentation
Important: The installation procedure below uses Docker-based Greenbone Community Edition. This is a convenient approach for Windows, macOS and Linux users.
7. Installation of OpenVAS on Windows
OpenVAS Community Edition does not have a conventional native Windows installer. Windows users can run the complete Greenbone stack using Docker Desktop or a Linux virtual machine.
Step 1: Enable WSL 2
Open PowerShell as Administrator and execute:
wsl –install
Restart the computer if requested.
Check the WSL version:
wsl –list –verbose
Step 2: Install Docker Desktop
- Visit the official Docker website.
- Download Docker Desktop for Windows.
- Install it using the WSL 2 backend.
- Start Docker Desktop.
- Verify that Docker is running.
Official website: Download Docker Desktop.
Verify installation:
docker –version
docker compose version
Step 3: Create the Greenbone directory
Open PowerShell:
mkdir C:\greenbone
cd C:\greenbone
Step 4: Download the official Compose file
curl.exe -f -L “https://greenbone.github.io/docs/latest/_static/compose.yaml” -o compose.yaml
This downloads the official Greenbone Community Edition Docker Compose configuration.
Step 5: Download the required images
docker compose -f compose.yaml pull
The command downloads the required Greenbone containers, including the scanner, management daemon, database and web interface.
Step 6: Start Greenbone
docker compose -f compose.yaml up -d
Check the running containers:
docker compose -f compose.yaml ps
Step 7: Set the administrator password
The default administrator account may initially use the password admin. Change it immediately.
docker compose -f compose.yaml exec -u gvmd gvmd gvmd –user=admin –new-password=’YourStrongPassword’
Replace the example password with a strong, unique password.
Step 8: Access the web interface
Open your browser:
Accept the local self-signed certificate warning only if you are connecting to your own trusted installation.
Log in with:
- Username: admin
- Password: Your newly configured password
Windows installation approach
Greenbone Community Edition is now running through Docker containers.
8. Installation of OpenVAS on macOS
Mac users can also install Greenbone Community Edition through Docker Desktop.
The Docker-based deployment keeps the application components inside containers rather than installing the complete scanner stack directly into macOS.
Step 1: Download Docker Desktop
Visit:
Download the version appropriate for your Mac:
- Apple Silicon (M-series processors)
- Intel-based Mac
Install and launch Docker Desktop.
Step 2: Verify Docker
Open the Terminal application:
docker –version
docker compose version
Step 3: Create an installation directory
mkdir -p ~/greenbone-community-edition
cd ~/greenbone-community-edition
Step 4: Download the Greenbone Compose file
curl -f -L \
https://greenbone.github.io/docs/latest/_static/compose.yaml \
-o compose.yaml
Step 5: Download the containers
docker compose -f compose.yaml pull
Step 6: Start Greenbone
docker compose -f compose.yaml up -d
Step 7: Check the running services
docker compose -f compose.yaml ps
To monitor the logs:
docker compose -f compose.yaml logs -f
Step 8: Configure the administrator password
docker compose -f compose.yaml exec -u gvmd gvmd \
gvmd –user=admin –new-password=’YourStrongPassword’
Step 9: Access the dashboard
Open Safari, Chrome or Firefox:
Enter your administrator credentials.
macOS note: Docker Desktop uses a Linux virtualized environment to run Linux containers. Allocate sufficient memory and disk resources in Docker Desktop settings, particularly for the initial vulnerability feed download.
9. Installation of OpenVAS on Linux (Ubuntu/Debian)
Linux is a convenient platform for running Greenbone Community Edition, particularly on dedicated security assessment servers.
The following procedure uses Ubuntu/Debian and the official Greenbone Community Containers.
Step 1: Update the system
sudo apt update
sudo apt upgrade -y
Step 2: Install required utilities
sudo apt install -y ca-certificates curl
Step 3: Install Docker Engine
Follow the official Docker Engine installation instructions for Ubuntu:
Docker Engine installation for Ubuntu.
Verify the installation:
sudo docker –version
sudo docker compose version
Step 4: Create the Greenbone directory
export DOWNLOAD_DIR=”$HOME/greenbone-community-edition”
mkdir -p “$DOWNLOAD_DIR”
cd “$DOWNLOAD_DIR”
Step 5: Download the official Compose file
curl -f -L \
https://greenbone.github.io/docs/latest/_static/compose.yaml \
-o “$DOWNLOAD_DIR/compose.yaml”
Step 6: Download Greenbone containers
sudo docker compose -f “$DOWNLOAD_DIR/compose.yaml” pull
This step may take some time depending on internet speed and the size of the container images.
Step 7: Start the services
sudo docker compose -f “$DOWNLOAD_DIR/compose.yaml” up -d
Step 8: Verify the installation
sudo docker compose -f “$DOWNLOAD_DIR/compose.yaml” ps
Check service logs:
sudo docker compose -f “$DOWNLOAD_DIR/compose.yaml” logs -f
Step 9: Configure the administrator password
sudo docker compose -f “$DOWNLOAD_DIR/compose.yaml” \
exec -u gvmd gvmd gvmd \
–user=admin –new-password=’YourStrongPassword’
Step 10: Access Greenbone
Open the browser:
Log in using your administrator account.
Additional Linux commands
To stop Greenbone:
sudo docker compose -f “$DOWNLOAD_DIR/compose.yaml” down
To start it again:
sudo docker compose -f “$DOWNLOAD_DIR/compose.yaml” up -d
To view container status:
sudo docker compose -f “$DOWNLOAD_DIR/compose.yaml” ps
To monitor logs:
sudo docker compose -f “$DOWNLOAD_DIR/compose.yaml” logs -f
Important installation considerations:
- Wait for the initial vulnerability feeds and other data to finish loading before performing the first scan.
- Do not delete persistent Docker volumes when stopping or restarting the application.
- Keep Docker images and Greenbone feed data updated.
- The Compose deployment documented by Greenbone is intended primarily for testing and familiarization, not as a ready-made production deployment. Review production security, backup, availability and access-control requirements before organizational use.
Greenbone Community Documentation+1
10. How to perform a vulnerability scan using OpenVAS
After successfully installing Greenbone Community Edition, the next step is to perform a vulnerability assessment.
Step 1: Log in to Greenbone
Open:
Enter your administrator username and password.
The Greenbone Security Assistant dashboard provides access to scanning tasks, targets, reports and configuration settings.
Step 2: Create a scanning target
A target is the system or network that you want to assess.
Navigate to:
Configuration → Targets → New Target
Enter the following details:
| Field | Example |
| Name | Ubuntu Test Server |
| Hosts | 192.168.1.100 |
| Port List | All IANA assigned TCP |
| Alive Test | Scan Config Default |
Replace the example IP address with the address of a system that you own or are explicitly authorized to assess.
Save the target.
Step 3: Create a scanning task
Navigate to:
Scans → Tasks → New Task
Configure the following:
| Parameter | Example |
| Name | Ubuntu Vulnerability Assessment |
| Scan Target | Ubuntu Test Server |
| Scanner | OpenVAS Default |
| Scan Configuration | Full and Fast |
| Schedule | Once |
The Full and Fast configuration is a useful starting point for a general vulnerability assessment.
Save the task.
Step 4: Start the scan
Locate your newly created task and click the Start button.
Greenbone will begin performing vulnerability tests against the selected target.
The scan may take several minutes or longer depending on:
- Number of target hosts
- Network connectivity
- Selected scan configuration
- Number of enabled vulnerability tests
- Target system response time
Step 5: Review scan results
After the scan finishes, open the task report.
The results can include:
- Detected vulnerabilities
- CVE references
- Severity scores
- Affected hosts
- Port and service information
- Vulnerability descriptions
- Technical evidence
- Recommended remediation actions
11. Understanding vulnerability severity levels
OpenVAS uses severity information to help security professionals prioritize remediation.
A common way of presenting CVSS-based vulnerability severity is:
| Severity | CVSS score | Priority |
| Critical | 9.0–10.0 | Immediate attention |
| High | 7.0–8.9 | High priority |
| Medium | 4.0–6.9 | Planned remediation |
| Low | 0.1–3.9 | Review and address |
| Log / Info | 0.0 or informational | Review as appropriate |
Note: The above is the commonly used CVSS v3.x severity classification. CVSS version and scoring methodology should be checked when interpreting individual findings. An informational result is not necessarily a vulnerability.
What is CVE?
CVE stands for Common Vulnerabilities and Exposures.
It provides standardized identifiers for publicly known cybersecurity vulnerabilities.
For example:
CVE-2021-44228
This identifier refers to the well-known Log4Shell vulnerability affecting Apache Log4j.
Greenbone can associate detected findings with CVE references where applicable.
What is CVSS?
CVSS stands for Common Vulnerability Scoring System.
It provides a standardized approach to evaluating the severity of security vulnerabilities.
CVSS scores help organizations determine which vulnerabilities need immediate attention.
However, severity should also be evaluated against business impact, asset criticality, exposure and exploitability.
12. How to generate and download an OpenVAS report
Report generation is one of the most useful features of Greenbone because it allows security teams to document vulnerability assessment results and share them with system administrators, auditors and management.
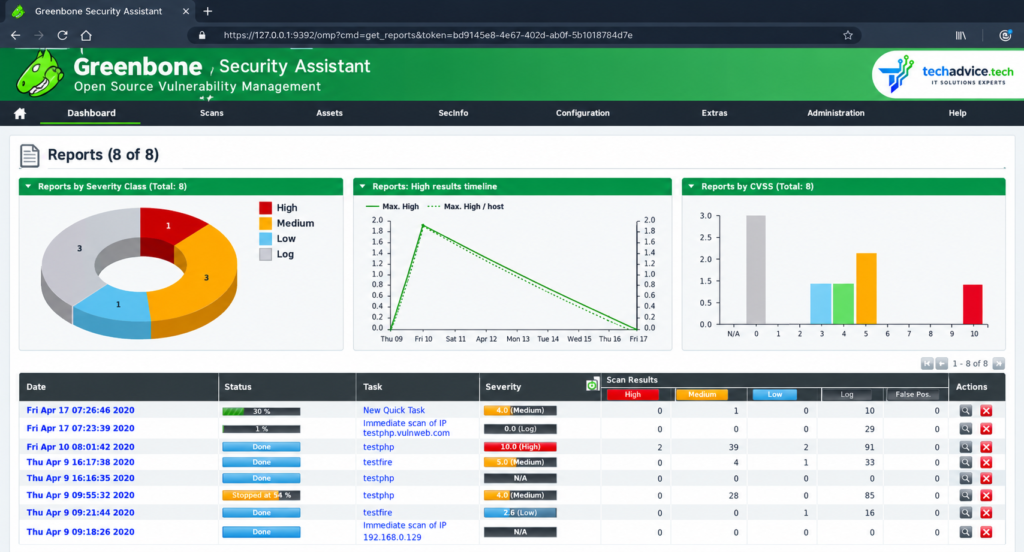
Step 1: Open the completed scan
Navigate to:
Scans → Tasks
Select the completed scanning task.
Open the associated report.
Step 2: Review the vulnerability findings
Before downloading, review:
- Number of affected hosts
- Total vulnerability findings
- Critical and high-severity issues
- CVE references
- Technical evidence
- Suggested remediation
Step 3: Select the report format
Greenbone provides different report formats depending on the installed report-format definitions and version.
Commonly supported formats include:
| Format | Purpose |
| Sharing assessment results with management and auditors | |
| HTML | Reviewing findings in a browser |
| XML | Structured vulnerability data and integration |
| CSV | Spreadsheet analysis and tracking |
| TXT | Plain-text output |
| JSON | Structured data for automation, where supported |
Step 4: Export the report
- Open the required scan report.
- Locate the report export or download option.
- Select the required report format.
- Apply the desired report filters.
- Generate and download the report.
Greenbone’s report documentation also describes executive and technical report options in supported product editions. Available options differ between Greenbone products and versions.
Greenbone Cloud Service+1
Step 5: Analyze the generated report
A vulnerability assessment report should ideally contain the following sections:
- Executive Summary
- Scope of Assessment
- Assessment Methodology
- Asset and Host Details
- Vulnerability Summary
- Critical and High-Risk Findings
- CVE and CVSS References
- Technical Evidence
- Remediation Recommendations
- Conclusion
Example of a vulnerability assessment report
Vulnerability Assessment Report
Illustrative sample
Sample findings only — not actual scan results.
02
Critical findings
05
High findings
08
Medium findings
04
Low findings
Sample findings
| Vulnerability | Severity | Suggested action |
| Outdated software | High | Apply security updates |
| Weak TLS configuration | Medium | Harden TLS settings |
| Exposed service | High | Restrict network access |
| Information disclosure | Low | Review service configuration |
Use actual scan evidence and verified findings in a real assessment report.
13. Best practices for using OpenVAS
For effective vulnerability management, organizations should follow these practices:
- Update vulnerability feeds regularly: Use current Greenbone Community Feed data.
- Scan authorized assets only: Obtain written authorization before assessing any third-party system.
- Perform regular scans: Establish a suitable scanning schedule based on risk and organizational requirements.
- Prioritize critical findings: Address actively exploitable and internet-exposed vulnerabilities first.
- Validate findings: Manually verify important findings to reduce false positives.
- Maintain scan records: Store assessment reports securely.
- Perform remediation verification: Conduct follow-up scans after corrective actions.
- Protect the scanner: Restrict administrative access and secure its management interface.
- Back up data: Maintain backups of configurations and important assessment records.
- Document exceptions: Record accepted risks, compensating controls and remediation deadlines.
14. Advantages and limitations of OpenVAS
Advantages
- Open-source vulnerability management solution.
- Supports a wide range of networked systems and services.
- Provides vulnerability details and severity information.
- Offers a graphical web-based interface.
- Supports scheduled vulnerability assessments.
- Provides report generation and export capabilities.
- Useful for security audits and vulnerability management programs.
Limitations
- Initial installation and feed synchronization can take time.
- Requires sufficient hardware resources.
- Some findings may require manual verification.
- Authenticated scanning requires appropriate credentials and configuration.
- Vulnerability scanning cannot replace penetration testing.
- The Community Edition does not provide all the commercial features and support available in Greenbone’s enterprise offerings.
15. OpenVAS vs Nessus
Both OpenVAS and Nessus are popular vulnerability assessment tools. However, their licensing models, features and management capabilities differ.
OpenVAS vs Nessus: Which is the best choice for you? [2025]
| Feature | OpenVAS / Greenbone Community Edition | Nessus |
| Licensing | Open-source community edition | Proprietary |
| Vulnerability scanning | Yes | Yes |
| Web interface | Yes | Yes |
| Vulnerability feeds | Greenbone Community Feed | Tenable vulnerability plugins |
| Report generation | Yes | Yes |
| Authenticated scanning | Supported | Supported |
| Commercial support | Separate Greenbone offerings | Tenable support offerings |
| Deployment | Containers, supported Linux distributions and appliances | Supported operating systems and appliances, depending on edition |
Which one should you choose?
OpenVAS is a good choice for security professionals who want to learn vulnerability assessment and deploy an open-source vulnerability management solution.
Nessus is worth evaluating when commercial support, particular integrations or Tenable’s product ecosystem are important requirements.
Neither tool should be treated as a complete substitute for a comprehensive security assessment.
16. Conclusion
OpenVAS, as part of Greenbone Community Edition, is a valuable solution for identifying and managing security vulnerabilities across IT infrastructure.
Its open-source approach, vulnerability scanning capabilities, web-based management interface and reporting features make it useful for cybersecurity students, system administrators, penetration testers and enterprise security teams.
Whether you are assessing a Linux server, Windows workstation, network infrastructure or authorized cloud-hosted system, Greenbone can help identify security weaknesses and support a structured vulnerability management process.
For organizations following an ISO/IEC 27001-based Information Security Management System, vulnerability scanning can also contribute useful technical evidence to vulnerability management and risk treatment activities.
However, the real value of a vulnerability scanner comes not just from discovering weaknesses, but from ensuring that identified vulnerabilities are reviewed, prioritized, remediated and verified.
Please also read https://techadvice.tech/owasp-zap-tutorial-installation-scanning-report/